Showing posts with label idea. Show all posts

Friday, May 21, 2021

DIY Building Outdoor Chain Link Dog Kennel Roof [DOG KENNEL]


This is the final product. I show the below steps from start to finish on this nice new dog kennel.
This tarped over dog chain link fenced in dog kennel needed a nice roof put on it. The tarp and fence served their purpose but it's time for more of a permanent fix.
The first order of business is to pull off the old scabbed together cross members that offered some temporary support for the tarp. Once the old "roof" was off I took some measurements and headed out to Lowes. I bought some two by fours, one by threes, plastic roofing, some screws, brackets, moulding to match the roof and some small nails to hold the plastic roof moulding down to the frame.
I took the 2X4's and played them across the top of the dog kennel fencing.
I then took the outer perimeter roof 1X3's and screws them dow to the 2X4 cross members making sure the frame stayed square.
I then nailed the moulding for the roof down to the cross members. I used some smaller sized nails so as not to crack the thin moulding.
Now its' time to lay the sheets of the plastic roofing down into the moulding. It fit quite nicely.
This took a little bit of time but not much at all. I overlapped the plastic roofing as well.
The overlap prevents the water from getting down into there.
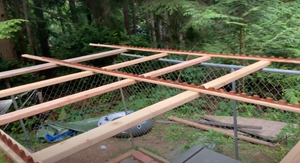
This is a shot of the roof before the plastic sheeting gets put on. It shows almost the full installation of the roof moulding.
Once the sheets are overlapped I screwed them into the moulding with screws containing rubber grommets. If I could do this job again I think I would screw to the top of the moulding rather than in the valley to allow the water to flow more freely and also so it wouldn't be a stopping point for catching tree debris.
Slapping it all up there and screwing it down. This was all a one man job as all of the materials are very light and easy to work with.
I used brackets to secure the roof to the side walls of the chain link kennel to keep it from sliding off.
Here it is with all of the plastic sheeting put up and screwed down.
I secure the roof more with the brackets. The brackets are galvanized so they won't rust. I used a cordless drill to screw these in.
This is the spot/side where the water will run off. It's very slightly angled (not on purpose) so it makes it nice.I think if it wasn't already angled a little bit I'd stick some shims or some sort of riser under one side in order for it to have some kind of slope.
The dogs loved it. This acts as just a temporary shelter for them due to it's size. They get to stay inside during the night and in times of harsh weather.
Here's one last shot of the finished product. Way more sturdy than the tarp that was on there before.

Monday, April 6, 2020

DIY How to Grill Mangoes | What's better than a Mango? | Answer: Another...


My love for mango's can only be shown here when I throw them on the barbie and grill them up. I added no extra ingredients and their natural sugars came out and the result was delicious. If you really want to spice this process up:
1. Coat with Sliced Mangos with Melted Butter
2. Sprinkled with Brown Sugar or Regular Sugar
3. Cayenne Pepper for a kick at the end

You won't be disappointed either way. Grilling these mangos is a nice addition to your menu for either just yourself of when entertaining friends. Follow the three steps above to really set this off.

Grill from Amazon:
https://amzn.to/349gCvX

Wednesday, October 9, 2019

DIY Pallet Project: Shop Table From Pallets-Repurposed Wood Made Into Us...


In this DIY Pallet Project: Shop Table From Pallets "How to" video, I take you step by step through my process on using old pallet wood to create a shop table. For the Table top, the first step was to get all my slats separated, get the nails pulled out, and clean them all up. I cut them all to the same length and placed them on two longer aluminum clamps. Pipe clamps work well here too. Once I get them square, flat, and straight, then I took two perpendicular lengths of wood and drilled and screwed them up through the bottom to hold it all in place. I then drilled and screwed 4 equal legs on. I then cut a couple of blocks for extra reinforcement, drilled, and screwed those on as well in between the legs and the cross members on the underside of the pallet table surface. I custom made the metal angle iron brackets as well. I had some old metal bed rails laying around so I sectioned them up and drilled holes in them to facilitate screws and used them for reinforcing brackets. I used some repurposed lag bolts to secure these. I sanded the top surface of the table so it was nice and smooth and flat. I decided that I needed a shelf down below for extra storage so I hit up my pallet pile again. I pulled off some more slats carefully so as not to crack or break the boards in the process. I got the nails all pulled out and cut to length on the table saw. I used some of these for the trim around the top of the table so it had a nice finish. I then created the second shelf down below using more pieces from the pallet pile and nailed them together with a brad nailer.
Tools used:
Table Saw:
https://amzn.to/31W6epw
Cordless Drill:
https://amzn.to/31WRgiO
Brad Nailer:
https://amzn.to/30UA50b
Air Compressor:
https://amzn.to/35ftvop

Thursday, June 6, 2019

DIY Pallet Project: How to make a Pallet Playhouse


Reduce, Reuse, and Recycle! Upcycling materials for useful projects is most fulfilling. In this case the ground work foundation was laid with old pallets and the 2 X4's were pulled from an old building that was torn down. The tarpaper and shingles were left over from when I put a new roof on my house. Pallets are easy to come by and pull apart. I was actually able to obtain a bunch of nails when I  pulled them apart as well. A couple of them I had to straighten with my hammer on a flat surface.

Sorry for the horrific music. I was messing around on my acoustic and seemed like a good idea at the time to use it as a soundtrack. Most pallet projects are made to look a little rough so you can make most of them with standard electric and hand tools.

This playhouse was a joy to build. It got a lot of use by mine and the neighborhood kids. Once they grew out of it, it became a chicken coup that held numerous chickens that layed us many many fresh eggs. I even ended up making some egg laying boxes out of pallets for the chickens.


Once the chickens were gone it became a lawn and garden shed where I stored all my oils, gas, paint, tools, yard tools, etc. If you like pallet projects check out my youtube channel as I have a ton of DIY pallet projects.

If, after watching my DIY pallet playhouse construction video, you don't want to build one yourself, than maybe you can purchase one of the below.


MyShedPlans Banner 300x250