You can use cedar fence slats like I did or you can also use pallet wood. I made a few pairs of these using 5 1/2" wide by 6' long by 5/8" thick pieces purchased from Lowe. I had to spend some time sanding them but it was well worth it. We used popsicle sticks to get the proper and even spacing. This was a good excuse for me to also pick up some dewalt clamps to build these. Although I used my craftsman cordless brad nailer to put these together, you could use screws or even hand nail them together. I'll post the link to the decorative metal pieces we hammered into the cross members of the shutters. These were quick, cheap, and easy to make.
Clavos Nails, Premium Grade, 1 1/2 inch Diameter, Matte Black Powder Coat Finish (20) https://a.co/d/isfKMB1
Stuck or need help? Call me right now and show me your problem: http://paltap.me/DIYTechnician.
Please feel free to contact me directly if you need a hand or this isn't the exact answer that you need!
Showing posts with label DIY. Show all posts
Showing posts with label DIY. Show all posts
Sunday, August 21, 2022
Saturday, July 30, 2022
DanForce Brand Pluto Model Headlamp Unboxing and Review [DanForce Brand ...
Stuck or need help? Call me right now and show me your problem: http://paltap.me/DIYTechnician.
Please feel free to contact me directly if you need a hand or this isn't the exact answer that you need!
Hey everybody I got this DanForce brand ultra bright 1080 lumen headlamp to open and demo. This is a great addition to your overall DIY kit. Received this as a gift. Very stoked! It comes in the bag cool storage bag holy cow this thing looks like a seriously tactical headlamp here i can tell you that looks like it's gonna be bright i can't wait to try it out looks like it comes with some rechargeable batteries here. They go in here it's got an adjustable head strap adjustable side strap and okay the battery connector connection is right here the better connecting wire on and off there and i'll go ahead and put the batteries in here it comes with the usb charger as well if you gain access to this to put the rechargeable batteries in here it's got a nice little soft cover here it just peels up actually comes off it's being held on there with that little key. Lets see what ring thing will do. Kkay single beam there push it again and you get a double beam. Hh yeah there we go triple beam and we got strobe. Cool let's check this out let's test it out in the dark. All right got a dark room here single beam oh look at that that is awesome that's bright single beam there's double beam looks like it kind of uh it converges on one.
There's all three and then there's the strobe. This thing, despite it being, kind of bulky looking you hardly even know it's there it is really lightweight. I'm surprised by the looks of it. At first I thought things gonna be kind of bulky and kind of heavy not the case at all. Hey then we're done using it we just put it back in the bag one thing i didn't notice when i first opened it it's got a carabiner clip on there too all right here we are early in the morning let's check out the beam on this. There's the one this thing has some serious good penetrating power, the high beams, it's got all three. All right you guys this thing's awesome if you're thinking about getting one this is a good one to get all right thanks for watching.
Friday, July 22, 2022
DIY Allen and Roth Blackout Window Shade Installation Demonstration [All...
This Allen and Roth window shade was super easy to install and can be accomplished in a matter of minutes. I used a cordless drill for securing it's only two brackets to the interior of the window frame. Purchased at Lowe's. They are light weight and keep the sun from blasting through the window as well as provide maximum privacy. I take you step by step through the process in my "DIY Allen and Roth Blackout Window Shade Installation Demonstration [Allen and Roth Blackout Shade]" video.
Hey guys get some blinds i'm gonna put up here these allen and roth blinds but this is the before picture 47 inches across here's the blinds that we're going to be using
Okay again this was 47 inches across and these are 46 so you can see there's a little bit of a gap in there which is what you want which is the window seal will kind of make up that gap as well but if we did it on the full 47 i'm not sure that this would fit here's the brackets for these things okay we have a choice of either doing an inside mount like this or an outside mounting outside the frame here okay see those two dots there those are the marks i made with the pencil and i just made that because i'm going to pre-drill my holes right there
Now we're going to screw these into the two holes we just made to secure the bracket to the overhead all right we got our brackets up i'm just gonna pop the thing in there just snaps right in there gonna angle it down this piece is the handle to pull the shade down and it just grabs that lower edge you just snap it right on there i'll show you okay this is the upper portion so this just grabs that lip right there here we go
That was too easy
Thank you.
Friday, May 20, 2022
DIY Woodworking Making Cedar Garden Planter Boxes | Easiest Raised Bed D...
Gardening season is upon us and its time to grow your favorite crops in using this super easy raised garden bed design. I happened upon some scrap cedar from one of the local fencing places and made a couple of these for relatively free. You could get by with just a table saw and some screws if that's all you had and you could wind up with the same product. I like to use a combination of a table saw, chop saw, brad nailer and cordless drill with a few self tapping screws to hold the corners together for the long term. Not shown in this video is that I started using Romex wire staple type fasteners to hold the boards up against the frame. The brad nailer will hold just fine as the force of the dirt, when filled, pushes out against the boards so they won't as easily come loose but the Romex wire staples or some small wood screws or nails will work even better. This simple design is one that most inexperienced folks can use. The steps are as follows:
1. Cut four 2 X 4's to 30" in length
2. Using a table saw, rip those in half, lengthwise making 8 pieces
3. Cut 45 degree corners on all pieces
4. Using table saw, cut notch (ledge) into each piece
5. Nail corners together making two full picture frame structures identical to each other
6. Cut 16" wood slats
7. Nail slats into identical top and bottom frames
8. Using self tapping screws, screw into the corners
Now just fill it with topsoil and plant your favorite crop.
Please visit my website: https://www.diy-technician.com
Saturday, May 7, 2022
Luoran Brand MP3 Player Unboxing, Usage, and Review Demonstration [Luora...
This was right up my alley as I'm a huge music fan. In my video I unbox and set up this nice new Luoran MP3 Player with Bluetooth & WiFi, 4.0" IPS Display MP4 Portable Music Player with Full Touchscreen & Speaker, Metal Frame & Glass Back, with FM Radio, Audiobook, Browser, Up to 512GB (Black).
Here's the product link to it:
https://www.amazon.com/dp/B09GB4S9LQ/
Monday, April 25, 2022
AGPTEK A19X MP3 PLAYER Unboxing, Demonstration and Review [A19X MP3 PLAYER]
This AGPTEK A19X MP3 PLAYER performed very well. I was able to successfully download and transfer music to it. It is blue tooth capable so I was able to play music through both a portable speaker as well as wireless headphones which was really nice. The ear buds that came with it work really well and were nice and loud. It comes with a usb cord for charging and file transfer. The battery life on this is outstanding and very long lasting. I played this straight for nearly 8 hours and it still had well over 1/2 the battery life showing.
Friday, March 25, 2022
DIY Hand Forged MidEvil Long Twisted Spoon Tutorial Demonstration [How t...
Made my first ever DIY Hand Forged MidEvil Long Twisted Spoon Tutorial Demonstration [How to Forge a Spoon] as a present and it was a lot of fun. Used a propane burner and pounding block to hand made this big spoon.Once forging was complete I coated it in linseed oil.
Please stop by my website:
https://wwwdiy-technician.com
Wednesday, February 16, 2022
DIY Toyota Tacoma Headlamp Changeout Process and Upgrade [Toyota Tacoma ...
This video shows you the simple process of replacing your headlamps on a Toyota Tacoma. I had just completed shining up the outer headlamp surfaces (see my video on this) with a 3M brand headlight restoration kit but wanted to further improve my night driving visibility. It had gotten so bad that we couldn't barely make out the white line on the side of the roads in certain areas that were not otherwise lit up. The new headlamps are "100%" brighter according to the packaging and cost around $50 at the local NAPA auto parts store. Between cleaning and polishing the outer surface of the headlights and changing out the bulbs, the night vision while driving has improved quite a bit. I was glad I went with the 100% brighter as they actually were not as bright as I thought before installing them. I didn't want to be the jerk out there whose headlights are so bright it appears that the high beams are on. This is not the case with these just in case you were wondering. The new headlamps come with a 3 year warranty as well so I keep the receipt and old headlamps (for backups) just in case I needed to cash in on that warranty. The steps for chaining this out are very easy and are as follows:
No tools necessary.....
Step 1: Open hood
Step 2: Remove electrical connector plug from back of head lamp (it pulls straight out by hand)
Step 3: Remove rubber boot
Step 4. Unlatch holding spring
Step 5: Pull lamp out and install new one
It's just that easy!!!!
Please stop by my website and check it out:
https://www.diy-technician.com
Here's a paid link in case you want to change out the whole light assembly rather than polish the old ones:
For Toyota Tacoma Headlight 2005 2006 2007 2008 Driver and Passenger Side Headlamp Assembly Replacement:
https://amzn.to/3nyzxeB
Thursday, January 6, 2022
DIY Maytag Centennial Brand Clothing Dryer Installation Including Power ...
If you remember, take a picture of the existing dryer plug on the wall so you know which type of plug to purchase if you plan on replacing it. Make sure before you leave the store that you have an electrical cord in which to connect this with as every dryer I have ever purchased does NOT come with the electrical cord with it. I'm guessing this is likely because there are quite a few different versions of plugs in each house for various types of dryers. You install the cord on this you will also need a Phillips screwdriver. I used my cordless drill when I performed this operation. In my "DIY Maytag Centennial Brand Clothing Dryer Installation Including Power Cord [Maytag Dryer Installation Tutorial" video I take you step by step through the process of making it happen. While you are setting up your new dryer it may be a good time to clean out the lint in the dryer's vent duct.
Cenipar Dryer Vent Hose-4 inch Ducting Vent Hose Flexible Aluminum Foil Non-Insulated (4 inch 8 feet) with 2 Clamps (paid amazon link):
https://amzn.to/3q0lKio
Wednesday, December 29, 2021
Allen and Roth "Welton" Outdoor Wall Lantern Porch Light Installation Tu...
Here's how I installed this new LED Allen and Roth "Welton" Outdoor Wall Lantern Porch Light Installation Tutorial Part #2602001 [LED] model. I unbox and install this new power saving light fixture which also adds an upgraded decorative look. I first located the the breaker for the circuit that I was to be working on and shut off the power. I then verified I shut off the power with my voltage tester (will leave a link below to purchase on on amazon from which I get paid a very miniscule amount from if you purchase) and then unhooked the old light fixture. This one on this particular installation was pretty easy, it was just white to white, black to black and ground to ground. Once hooked up and verified that the wiring is super tight and not coming apart (I tug on it just to make sure), then I fire the power back up. Customer was very happy with this upgrade.
Klein Tools NCVT2PKIT Non-Contact Voltage Tester with Receptacle Tester, 12-48V AC or 48 - 1000V AC Dual Range for Broad Application (paid amazon link):
https://amzn.to/3n2HbxJ
Please stop by my website:
https://www.diy-technician.com
Friday, September 10, 2021
How to Use a Vacuum Sealer Food Saver Model Number VS3180 Tutorial [Food...
Need to know how to use your vacuum sealer Food Saver? Join me in my How to Use a Vacuum Sealer Food Saver Model Number VS3180 Tutorial [Food Saver Instructions] video where I show you how to operate it from start to finish packaging up some fresh caught salmon.
Here'a paid link to one in amazon:
FoodSaver VS3150 Multi-Use Vacuum Sealing & Food Preservation System with Additional Roll, Charcoal Stainless Steel, Black:
https://amzn.to/3BY6GFi
Here's the subtitle words of the video: Hi my favorite you tube folks, this video is on this food saver we got from costco model number vs3180 food saver vacuum sealing system so we bought this and some bags we're gonna vacuum pack some salmon.
okay plug this thing in and we've got the bag in here like this what we're gonna do is just seal up the very this first edge right there so you just bring your bring it till it's right in there
just to the edge right there and then you seal up that first end okay so now you close it and then this over here you have open store and operate so we're gonna go ahead and we're gonna we're gonna put this all the way down as soon as you do that the lights all come on up here now we're just going to go ahead and seal the first one so we're going to go ahead and push seal
okay so now that the seal indicator light is off that means this sealed so we'll go ahead and pop that out
we got our seal there okay so now this little piece just came out i had to tuck it back in there this little rubber piece but this sealed you can do one or two seals we're just gonna do one for now okay so you just have enough until uh this is how you know you get as big a bag as you want as long as it's gonna fit your your filet or whatever your push that down okay and now we go ahead and cut it okay i went ahead and flipped the latch down again and i'm going to go ahead and cut it there we go now pop the lid back up and then put our fillet in here okay we've got our bag cut now so we're going to lift this back up and roll the excess back in there
now we're going to seal up this end after we put our filling this end that we're going to seal up is going to go right in that drip tray that green one and that's removable you can take that out and clean
all right we got our fillets in there i'm going to open this back up and put the edge in here
a really good tip when you are sealing uh fish you want after you wash it you want to pat it dry really well with some paper towels okay now we're going to go here to operate
okay now uh we're gonna push the vacuum button okay there's vacuum right there and so
okay we're gonna push the vacuum button right here
you can see it's sucking all the
air and moisture to it once this indicator light is off then your item is sealed so it's still sealing it okay it's sealed now we're going to go ahead and pop this up to the top of the top there's our seal and we're all set all right here's the meat freezer
this is our crab bait oh yeah there's our human stuff
there we go you might be wondering what does this thing do you have to uh buy special bags to use this this is a handheld sealer there's a special circle on the bags you buy to use that so you can't use the bags the regular food saver bags for that which is okay we're just going to use our regular ones all right i'm going to finish this up thanks for watching.
More about this item:
This FoodSaver Multi-Use Preservation System keeps food fresh in the freezer up to 5x longer, and fresher longer in the fridge and pantry, compared to ordinary storage methods—and helps prevent freezer burn as well
It's versatile as it combines heat sealer and handheld vacuum sealer in one unit; use the heat seal strip for freezer storage, and the handheld sealer for fridge and pantry storage
This unit is equipped with 4 custom settings: seal delicate foods like baked goods without crushing using the pulse setting; marinate in minutes with marinate setting; dry and moist settings ensure an airtight seal is achieved regardless of the type of food you are sealing
Roll storage with built-in cutter bar so you can create custom-sized vacuum seal bags; time-saving features makes bags from rolls faster, by cutting your bag as you're sealing your next bag; alignment tool and angled opening ensure ideal bag placement; removable drip tray
This is so easy to use and all you have to do is simply press vacuum button to remove air and seal, and LED light indicates sealing is complete.
It keeps food fresh linger, it's versatile, has 4 settings and more features, and it's easy to use.
Wednesday, July 28, 2021
DIY HomeBrew Cooper's Irish Stout Recipe Making and Taste Testing [Coope...
DIY HomeBrew Cooper's Irish Stout Recipe Making and Taste Testing [Cooper's Irish Stout Home-brew]. This one is an estimated 5%. Great tasting. I like it better than guiness. I’ve had a couple stouts that are just outstanding. This one really has a nice sweeter taste to it. I was really surprised on how this one turned out. It has some wonderful notes of coffee and just a hint of licorice coupled with it’s nice and roasted smokey profile. It is a fully bodied beer with a smooth and creamy soft mouthfeel with moderate carbonation (but more than expected). As you can see from the video the sun has a hard time penetrating through the glass of the fine black stout thanks to the roasted barley. I can’t take full credit for making it as I purchased all of the ingredient. It was just a matter of putting them together correctly and waiting. It has a slight aroma of graininess and smoke. This batch turned out without any harsh characteristics or one characteristic overpowering the other, rather, just a nice enjoyable pleasant mix of all. The froth and creaminess of this stout seems to balance it all out and bring it all together. This beer is Vegan, however, I’m not sure if it’s necessarily Gluten free. No animals were killed during the brewing of this beer. The question gets asked sometimes, “Is Stout Good For you?”. It’s allegedly full of antioxidants and flavonoids which are the same thing that give fruits and veggies their dark color. Getting these anti-oxidants into your system is great for your heart and what a better way to do it than a tall glass of this nice home brewed delicious stout. Antioxidants are molecules that neutralise free radicals – unstable molecules that can harm your cells. We usually find them in foods such as raspberries, kale and artichokes – amidst many other fruits, vegetables and nuts. The health benefits associated with a diet packed with plants are at least partially due to the variety of antioxidants they provide your body! It’s been said that this will slow down the deposits of cholesterol on artery walls reducing risk of heart attacks. Stouts also generally have less calories per serving than other lighter beers!
Here's a paid link to the kit:
Irish Stout Homebrew Beer Ingredient Kit:
https://amzn.to/3zQQsNh
DIY GateHouse Hinge Pin Door Stop Installation Tutorial Demonstration [G...
DIY GateHouse Hinge Pin Door Stop Installation Tutorial Demonstration [Gatehouse Hinge Pin Doorstop]. The first step is to buy a couple of these and then pop the hinge pin on the door. I used a small screwdriver and lightly tapped it out of place. I installed these individually one by one. Once the hinge pin is removed I pushed the door stop down over the hinge pin and tapped it back into place. Once installed the hinge pin doorstop can be adjusted to your desired setting to either open further or open less. In this case I needed to keep the door knob from hitting the glass closet doors and causing a huge destructive mess so it was mandatory I put these on. Super easy installation and quick too. The door stops are cheap compared to a hole in the wall or a busted closet door. Thank you for watching and please leave me a comment or two.
Here's a paid link to a similar one on amazon:
Ives by Schlage 70A10B Hinge Pin Door Stop:
https://amzn.to/3zEZxbB
Please visit www.diy-technician.com
Friday, May 21, 2021
DIY Building Outdoor Chain Link Dog Kennel Roof [DOG KENNEL]


This is the final product. I show the below steps from start to finish on this nice new dog kennel.


This tarped over dog chain link fenced in dog kennel needed a nice roof put on it. The tarp and fence served their purpose but it's time for more of a permanent fix.


The first order of business is to pull off the old scabbed together cross members that offered some temporary support for the tarp. Once the old "roof" was off I took some measurements and headed out to Lowes. I bought some two by fours, one by threes, plastic roofing, some screws, brackets, moulding to match the roof and some small nails to hold the plastic roof moulding down to the frame.


I took the 2X4's and played them across the top of the dog kennel fencing.


I then took the outer perimeter roof 1X3's and screws them dow to the 2X4 cross members making sure the frame stayed square.


I then nailed the moulding for the roof down to the cross members. I used some smaller sized nails so as not to crack the thin moulding.


Now its' time to lay the sheets of the plastic roofing down into the moulding. It fit quite nicely.


This took a little bit of time but not much at all. I overlapped the plastic roofing as well.


The overlap prevents the water from getting down into there.
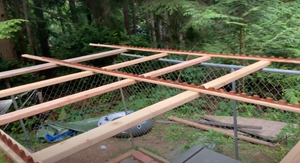

This is a shot of the roof before the plastic sheeting gets put on. It shows almost the full installation of the roof moulding.


Once the sheets are overlapped I screwed them into the moulding with screws containing rubber grommets. If I could do this job again I think I would screw to the top of the moulding rather than in the valley to allow the water to flow more freely and also so it wouldn't be a stopping point for catching tree debris.


Slapping it all up there and screwing it down. This was all a one man job as all of the materials are very light and easy to work with.


I used brackets to secure the roof to the side walls of the chain link kennel to keep it from sliding off.


Here it is with all of the plastic sheeting put up and screwed down.


I secure the roof more with the brackets. The brackets are galvanized so they won't rust. I used a cordless drill to screw these in.
This is the spot/side where the water will run off. It's very slightly angled (not on purpose) so it makes it nice.I think if it wasn't already angled a little bit I'd stick some shims or some sort of riser under one side in order for it to have some kind of slope.


The dogs loved it. This acts as just a temporary shelter for them due to it's size. They get to stay inside during the night and in times of harsh weather.


Here's one last shot of the finished product. Way more sturdy than the tarp that was on there before.
Monday, May 10, 2021
How to Charge Your Streetbike Motorcycle Battery Tutorial Demonstration [Motorcycle Battery Charge]


Subscribe to:
Posts (Atom)