Saturday, September 18, 2021


DIY How to Start and Drive & Operate Your Cub Cadet Riding Lawnmower [Cu...
First you must have your behind in the seat because there is a safety mechanism under the seat that will not allow the Cub Cadet Mower to start unless it's being engaged. The next thing is to press the brake on the left side down with your left leg/foot and then turn the key to the right. It should start right up. If not, first troubleshooting step is to make sure it has gas in the tank. This takes regular unleaded gasoline or ethanol free premium gas. Once the motor starts and you want to go, you will simultaneously slowly release the brake with your left foot and then engage throttle with your right foot by pressing the forward most lever. There are two levers located at your right foot. The front one is forward and the back one is for reverse.
This riding mower is a cub cadet riding mower and is an XT2 enduro series. I laugh about that and every time i think about "enduro" which to me means it's street legal.
Whenever I'm done I make it a habit to pull the key out because that battery will go dead as it has many times in the past which ends up costing me a battery replacement.
The throttle adjustment is important as well too. I usually like to keep it up high when I'm mowing an lower if I'm not mowing rather just transiting from one location to the other.
Here's a paid link to a 2win2buy Riding Lawn Mower Cover, Heavy Duty Waterproof Polyester Oxford Tractor Cover UV & Dust & Water Resistant,Universal Fit Decks up to 54" with Drawstring & Storage Bag (Black):
https://amzn.to/39kdLDG
Tuesday, September 14, 2021
Friday, September 10, 2021
How to Use a Vacuum Sealer Food Saver Model Number VS3180 Tutorial [Food...
Need to know how to use your vacuum sealer Food Saver? Join me in my How to Use a Vacuum Sealer Food Saver Model Number VS3180 Tutorial [Food Saver Instructions] video where I show you how to operate it from start to finish packaging up some fresh caught salmon.
Here'a paid link to one in amazon:
FoodSaver VS3150 Multi-Use Vacuum Sealing & Food Preservation System with Additional Roll, Charcoal Stainless Steel, Black:
https://amzn.to/3BY6GFi
Here's the subtitle words of the video: Hi my favorite you tube folks, this video is on this food saver we got from costco model number vs3180 food saver vacuum sealing system so we bought this and some bags we're gonna vacuum pack some salmon.
okay plug this thing in and we've got the bag in here like this what we're gonna do is just seal up the very this first edge right there so you just bring your bring it till it's right in there
just to the edge right there and then you seal up that first end okay so now you close it and then this over here you have open store and operate so we're gonna go ahead and we're gonna we're gonna put this all the way down as soon as you do that the lights all come on up here now we're just going to go ahead and seal the first one so we're going to go ahead and push seal
okay so now that the seal indicator light is off that means this sealed so we'll go ahead and pop that out
we got our seal there okay so now this little piece just came out i had to tuck it back in there this little rubber piece but this sealed you can do one or two seals we're just gonna do one for now okay so you just have enough until uh this is how you know you get as big a bag as you want as long as it's gonna fit your your filet or whatever your push that down okay and now we go ahead and cut it okay i went ahead and flipped the latch down again and i'm going to go ahead and cut it there we go now pop the lid back up and then put our fillet in here okay we've got our bag cut now so we're going to lift this back up and roll the excess back in there
now we're going to seal up this end after we put our filling this end that we're going to seal up is going to go right in that drip tray that green one and that's removable you can take that out and clean
all right we got our fillets in there i'm going to open this back up and put the edge in here
a really good tip when you are sealing uh fish you want after you wash it you want to pat it dry really well with some paper towels okay now we're going to go here to operate
okay now uh we're gonna push the vacuum button okay there's vacuum right there and so
okay we're gonna push the vacuum button right here
you can see it's sucking all the
air and moisture to it once this indicator light is off then your item is sealed so it's still sealing it okay it's sealed now we're going to go ahead and pop this up to the top of the top there's our seal and we're all set all right here's the meat freezer
this is our crab bait oh yeah there's our human stuff
there we go you might be wondering what does this thing do you have to uh buy special bags to use this this is a handheld sealer there's a special circle on the bags you buy to use that so you can't use the bags the regular food saver bags for that which is okay we're just going to use our regular ones all right i'm going to finish this up thanks for watching.
More about this item:
This FoodSaver Multi-Use Preservation System keeps food fresh in the freezer up to 5x longer, and fresher longer in the fridge and pantry, compared to ordinary storage methods—and helps prevent freezer burn as well
It's versatile as it combines heat sealer and handheld vacuum sealer in one unit; use the heat seal strip for freezer storage, and the handheld sealer for fridge and pantry storage
This unit is equipped with 4 custom settings: seal delicate foods like baked goods without crushing using the pulse setting; marinate in minutes with marinate setting; dry and moist settings ensure an airtight seal is achieved regardless of the type of food you are sealing
Roll storage with built-in cutter bar so you can create custom-sized vacuum seal bags; time-saving features makes bags from rolls faster, by cutting your bag as you're sealing your next bag; alignment tool and angled opening ensure ideal bag placement; removable drip tray
This is so easy to use and all you have to do is simply press vacuum button to remove air and seal, and LED light indicates sealing is complete.
It keeps food fresh linger, it's versatile, has 4 settings and more features, and it's easy to use.
Friday, September 3, 2021
DIY How to Re-Handle An Old Axe Head with 28" Tennessee Hickory Handle [...
For many of my fellow enthusiasts, refurbishing old axes and woodcutting equipment is very rewarding. It brings new life and purpose to tools that would otherwise be left in their tired and broken state on a shelf somewhere or even discarded headed towards the local landfill. Repair of many types of simple woodcutting tools is fairly inexpensive when compared to purchasing new. Many tools like sledge hammers, axes and picks can last a lifetime and even get passed down from generation to generation, which I’ve personally experienced. In some cases, the repair of these tools is essential to survival because through their use, warmth can be obtained. In other cases, with regards to repair, it can be a matter of having an extra as a backup or just be great pieces for topics of discussion or for display. With regards to axes, if you regularly use your axe than no doubt at some point in the game you’ll be faced with the need to replace your axe handle.
Part of the fun in getting into or being part of refurbishing axe heads and handles is learning and knowing what the various types of patterns, shapes and sizes of axes (and other tools) are called.
Pertinent to this refurbishment project is some terminology such what is another name or what is a handle (a.k.a. a helve or haft) which is known as the hang. The hang of an ax is always a matter of personal choice. You should hang your ax to suit you. This should be where the head is neither too heavy nor too light, and the axe handle is just the right length for the user. Another feature of an axe head is called the “eye” of the axe. This is the opening in the axe head where the handle fits up into.
For axe handle replacement, some of the tools you’ll need are as follows:
§ Vise
§ Hand saw
§ Drill and drill bits
§ Slotted screwdriver, piece of hardened steel (i.e. cold chisel)
§ Hammer
Amazon (paid) Link to a Set of 3 Extra 19" Hickory Handles for Tomahawks & Axes:
https://amzn.to/3DpBxfk
Please visit my website: www.diy-technician.com
How to put your Cub Cadet Riding Lawn Mower in Neutral [Cub Cadet Neutral]
Youtube Short on "How to put your Cub Cadet Riding Lawn Mower in Neutral". This is simply done by pulling the lever down below being the seat. It's a little inconspicuous so if you don't know how to do this or you've lost your owner's manual for this machine than you may find yourself trying to push it while it's in gear which is really tough. I did just that until I though "there has to be a way to put this in neutral". It was easy enough once I looked around and tried a few things before finally figuring out that the answer lies in just simply pulling this "L" shaped piece of round wire/stock coming out of the back of the mower.
Here's a paid amazon link to one:
CUB CADET 19A30030100 FastAttach Double Bagger 42" 46" Deck XT1 XT2 LX46 LX42:
https://amzn.to/3gG4YA
Visit my website: https://www.diy-technician.com
Sunday, August 29, 2021
Cub Cadet Riding Lawn Mower Air Filter Removal Tutorial [Cub Cadet Air F...
Quick demonstration on how to easily change the air filter on your cub cadet riding lawn mower. You don't need to completely remove the hood to change the air filter (the hood does easily detach with minimal effort as shown in my video here: https://youtu.be/_eeUKdvqSKc).
Air filters are cheap and easy to replace on these riding mowers so as a part of normal maintenance and upkeep I like to slap a fresh one in there every season or two.
Here's a paid amazon link to the replacement air filter:
HEYZLASS 2 Pack 32 083 09-S Air Filter, Replace for Kohler KT715 KT725 KT730 KT735 KT740 KT745 Engine Cub Cadet Lawn Mower Air Filter, Premium 32 083 09 32 883 09-S1 Air Filter:
https://amzn.to/3ztzvIX
Here's a paid amazon link to CUB CADET 19A30030100 FastAttach Double Bagger 42" 46" Deck XT1 XT2 LX46 LX42:
https://amzn.to/3mHRDuR
Please stop by https://www.diy-technician.com
Saturday, August 28, 2021
How to put your Cub Cadet Riding Lawn Mower in Neutral [Cub Cadet Neutral]
Youtube Short on "How to put your Cub Cadet Riding Lawn Mower in Neutral". This is simply done by pulling the lever down below being the seat. It's a little inconspicuous so if you don't know how to do this or you've lost your owner's manual for this machine than you may find yourself trying to push it while it's in gear which is really tough. I did just that until I though "there has to be a way to put this in neutral". It was easy enough once I looked around and tried a few things before finally figuring out that the answer lies in just simply pulling this "L" shaped piece of round wire/stock coming out of the back of the mower.
Here's a paid amazon link to one:
CUB CADET 19A30030100 FastAttach Double Bagger 42" 46" Deck XT1 XT2 LX46 LX42:
https://amzn.to/3gG4YAl
DIY How to Install a Honeywell Brand Digital Passcode Knob Instructional...
Step by step installation instructions shown here in my "DIY How to Install a Honeywell Brand Digital Passcode Knob Instructional Tutorial [Honeywell Knob]". I have really been impressed with this thing and is a nice addition/upgrade to have. Even though this was designed for exterior doors, it will work just fine on interior home bedroom doors as well. Batteries do NOT come with this package and you will need them. You will need 4 (four) AA batteries.
Here is a paid link to one on amazon:
Honeywell Safes & Door Locks - 8732401 Electronic Entry Knob Door Lock, Oil Rubbed Bronze, 6.5 x 8.8 x 9 inches:
https://amzn.to/3jm5pS0
#honeywell
#doorknob
#knob
#digital
#coded
#lock
Visit www.diy-technician.com
Sunday, August 22, 2021
Weeylite Brand Ringlight Unboxing and Functional Review Tutorial Demonst...
Weeylite ring light is a very versatile source of light with many different options. You can hook this nice light up to blue tooth and it also had a battery built into it so it can turn into a portable light. It comes with a USB charger which is a very nice option for charging. This light’s options on the lighting shades cover almost every color on the spectrum from very low or dim to very bright. This is ideal for almost any workshop or video making operation where lighting and portability is an issue. This will fix your up close lighting problems. It has white light, yellow light, green light, blue light, and you could say that it has orange and a shade of purple as well depending on how you adjust it. The on/off button must be held in for a second or two to turn it on and off. This is the button on the left as you look at the back of the light. The button on the right is the mode selection. The button on the right is the color mode switcher. The knob on the lower right adjusts the brightness of each hue. This know can also be pushed for use as a selector on the multi-color function. Overall great light.
Here is a paid amazon link to one:
Weeylite 18inch Led Ring Light with Phone Holder, RGB Circle Light with Stand for Makeup/Selfie/YouTube Video/TikTok/Live Stream, 2500K-8500K/36000 RGB Color/ LCD Screen/APP Control:
https://amzn.to/3j4fIKm
This 18 inch RGB Ring Light with standard bi-Color mode 2500k-8500k, brightness adjustment 0%~100%, 36000 kinds of colorful lights and 17 special scenes modes, like flash/ alarm/ movie/ rainbow/ party atmosphere/ fairytale, etc. Different lighting options find the best lighting settings for your use.
LED Ring Light with APP Control/ Multiple Group Control: Support mobile APP to adjust the RGB color and all the light features, the ring light also has manual adjustment on the light itself without using app remote control. 6 groups 19 channels are available to control multiple ring lights for your professional photography demand.
Ring Light with Tripod Stand/ Phone Holder: Aluminum Alloy Light Stand (INCLUDED) is 19.3" and Maximum height is 67" . Light kit comes with a hot-shoe mount, with phone holder you can take photo vertical and horizontally and allows you to make selfie or live broadcasting easily.
Ring light support 2 power supply methods, AC power adapter or 2x Li-batteries ( note: batteries are sold separately.) Simple Intuitive Operation with LCD screen on the back.
Ring Light RGB Kit includes: 1 x 18 inch RGB LED Ring Light, 1 x Tripod Stand,1 x Cell Phone Holder, 1 x Power Adapter and a Bag for travel.
Thursday, August 12, 2021
Fitness Gear Pro Series Olympic Weight Set Assembly Dick's Sporting Good...
I assemble and use this Fitness Gear Pro Series Olympic Weight Set Assembly Dick's Sporting Goods [Fitness Gear Weight Set] and bench.
Here's a paid link to a Fitness Gear Pro Utility Bench:
https://amzn.to/37D3tha
Fitness Gear Pro Olympic Bench:
https://amzn.to/3s9uXV2
Wednesday, August 11, 2021
How to Set Your Honeywell Brand Door Knob Codes, Auto-lock, Delete Old C...
In my video "How to Set Your Honeywell Brand Door Knob Codes, Auto-lock, Delete Old Codes and Factory Reset" I show you how to program your new Honeywell Brand programmable door knob to perform to your liking. It has silent features as well as auto locking and interior control to the max. It was a little on the expensive side to purchase but it was well worth it as it contains a bunch of unique security features.
The Honeywell Digital Knob Handleset features a programmable lock that allows you to set up individual codes for multiple users. a backlit keypad that automatically lights up when its being used, and a remote control fob for easy access. Adjustable latch fits 1-3/8 In. - 1-3/4 In. thick doors and 2-3/8 In. - 2-3/4 In. adjustable backset. Lock can be easily rekeyed by any locksmith. Locks have a Grade-3 Residential Security; tested by ANSI (American National Standards Institute) to meet standards for residential security. E-Z installation with a Phillips screwdriver when holes are pre-drilled into door. Can be installed on left or right handed doors for your convenience. Package contents include an adjustable latch, adjustable backset, mounting hardware, instructions, drilling template, remote control fob with back up key, and two (2) additional entry keys for non-electronic access. They claim that this is backed by a mechanical and finish limited lifetime warranty.
Here’s a link to the owner’s manual and set up guide:
http://honeywellsafes.com/UserFiles/Manuals/HW%20DIGITAL%20KNOB.pdf
TO UNLOCK THE LOCK Using Keypad: Enter a valid User Code (default code is 1234) and press (Unlock button) and hear 1 beep and lights green.
TO LOCK THE LOCK Using Keypad: Press (Lock Button) and then hear 2 beeps and lights red.
Changing Programming Code
CHANGE CURRENT OR PRESET PROGRAMING CODE (PC)
Factory default Programming Code (PC) = 123456, this is the master password for your lock. All programming functions require this code. Follow the below sequence to change the Programming Code (PC) to your custom 6 digit combination.
Type in (PC) + (Unlock Button) + 4 + (Unlock Button) + (New 6 digit PC of your choice) + (Unlock Button)+ Re-enter New PC + (Unlock Button)
Hear 1 beep and Light Indicator illuminates green. Record New and Changed Codes so you won’t forget them.
TO ADD A NEW USER CODE (you can add up to 50 new user codes)
The User Code (UC) must be a 4-8 digit combination. Each User Code (UC) is then linked to a User ID (ID) (which is any number between 01-50) to identify an individual User Code (UC). (User ID [ID] 1-9 should be entered as 01-09 so they are 2 digits).
As an example: to add the User ID-08 to User Code-5678, enter the following:
(PC) + (Unlock Button) + 1 + (Unlock Button) + (08) + (Unlock Button) + 5678 + (Unlock Button) + 5678 + (Unlock Button)
Hear 1 beep and Light Indicator illuminates green. NOTE: When a NEW USER CODE is set, the default factory code (1234) is deleted for safety. Record New and Changed Codes
Deleting User Codes
Delete one existing or preset user code
The programmable knob comes with a factory User ID (ID)= 01 for User Code (UC)=1234
In order to delete 1 User Code (UC), the lock must have more than 1 User Code (UC) in it’s database
(PC) + (Unlock Button) + 2 + (Unlock Button) + Existing (ID) + (Unlock Button) + re-enter (ID) + (Unlock Button)
Hear 1 beep and the Light Indicator will illuminate green.
Delete all User Codes:
This will delete the user codes (UC) but not the programming code (PC)
(PC) + (Unlock Button) + 3 + (Unlock Button) + re-enter (PC) + (Unlock Button)
Hear 1 beep and the Light Indicator will illuminate green.
Automatic Lock Function:
This one is one of my favorite functions of this nice lock
Set or Cancel Auto Lock
You can set the lock to automatically close after each time the lock is opened. Time value range = 20 - 900 seconds, enter the following:
To set the auto lock (PC) + (Unlock Button) + 5 + (Unlock button) + Time Value + (Unlock Button)
Hear 1 beep and the Light Indicator will illuminate green
Secure Lock-out Period
Warning sounds and LED flashes red after 4 incorrect code attempts: Keypad shuts down for 30 seconds.
Turning Sound On or Off
You can “mute” or turn the “sound on” on your lock by entering the following. (Factory setting is sound on).
(PC) + (Unlock Button) + 6 + (Unlock Button) + 1 or 2 + (Unlock Button)
1=sound Off
2=sound on
Sound Off (1) - Light Indicator illuminates green. Sound On (2) - Hear 1 beep and Light Indicator illuminates green.
Monday, August 9, 2021
DIY How to Upgrade and Change an Electrical Wall Outlet 110V Household P...
The first step I did was to turn off the power at the breaker then verified that it was in fact by making sure a plugged in light didn't turn on as well as verifying with a voltage sensor. Once I confirmed the power was off unscrewed the old electrical outlet and discarded it. The new one went on the exact same way as the old one came off. Once I tightened down my new connections I gave the wires a nice tug to make sure they were secured properly and won't come free. I added a layer of weatherproofing and then a new outlet cover and called it a day. I turned the breaker back on and was in business with a brand new upgraded outlet.
When you can please visit my website: https://www.diy-technician.com
Here's a paid amazon link to some outlets(if you buy from here I get a super small profit):
ENERLITES Duplex Receptacle Outlet, Tamper-Resistant Electrical Wall Outlets, Residential Grade, 3-Wire, Self-Grounding, 2-Pole,15A 125V, UL Listed, 61580-TR-W-10PCS, White (10 Pack):
https://amzn.to/2VF4jHW
Description is as follows(for what it's worth): Tamper-resistant (TR) receptacles prevent unwanted objects from being inserted. High impact-resistant polycarbonate thermoplastic cover and body for long service life
Suitable for residential such as homes, apartments, condominiums and for commercial use in corporate buildings, hotels, and restaurants that only require a 15A outlet (they can still be tampered with).
Shallow body design for maximum wiring; backstab or side options. Break-off plaster ears (yokes tabs). Installation instructions included (if you need these you shouldn't be installing it). Outlet Dimensions: 4. 06” H x 1. 31” L x . 09” D (whatever they are all standard anyway)
Use with ENERLITES wall plates for the best fit and color match, part numbers 8821-W standard size, 8821M-W mid-size, or 8821O-W oversize
Nobody cares about this but all they comply with 2017 NEC, Article 406. 12 for tamper-resistant receptacles. 15A 125V, 5-15R, self-grounding, 2-pole, 3-Wire. UL94, V2 Rating, 1-year , UL Listed
material type: Plastic;Steel
Sunday, August 1, 2021
Wagonwheel Lake Hike/Run Olympic National Forest WA State | 2.9 Miles Ve...
This butt kicker starts off slow at the trailhead through some mildly steep ferns and then progresses into an endless series of grueling switchbacks.Once you think you're getting close to the top or to the lake, the steep part is just beginning. It keeps getting steeper and steeper to the top. Once you reach near the top the trail side-hills it and makes you think it's going to stay flat for a bit but then it inclines some more. It then takes you through a nice brushy green area that was a landslide area some time ago and looks like perfect country for a bear, filled with cover and berries. In April and May time frame this is where I'd hit snow both times and had to turn around as I was unprepared as a first time hiker of this trail. This particular section in the end of July and August its nearly overgrown with many greens and trees across the trail so one must be careful not to get your ankle stuck in these. Once you pass this area you'll cross a little creek and then shortly after the lake will be on your right. It's a nice beautiful green and deep looking. On this day there were so many bugs and butterflies that I couldn't hang near the shore for very long without getting eaten alive, even with a hefty coat of bug spray on. They seemed to be immune. The reward is fairly nice, however, it it's just cooling off you're after, you may be disappointed as that can be done down at lake Cushman or it's inflowing Skokomish River. There were many nice salmon berries to eat along the way. The only wildlife seen today on this hike was a family of grouse and a newt that surfaced at the lake. Once the lake experience is done it was time to head back down. This descent makes you painfully aware that a whole new set of muscles gets used for heading downhill. I don't recommend this to anyone as it's quite dangerous but I decided to double time the nearly the whole way, pushing my limits as it was 90+ degrees on this day. I made it down from the lake to the trailhead in 56 minutes. I took a few breaks to film along the way. I slept like a rock that night with the stars over my head at the Staircase campground. Wonderful experience overall.
Wednesday, July 28, 2021
DIY HomeBrew Cooper's Irish Stout Recipe Making and Taste Testing [Coope...
DIY HomeBrew Cooper's Irish Stout Recipe Making and Taste Testing [Cooper's Irish Stout Home-brew]. This one is an estimated 5%. Great tasting. I like it better than guiness. I’ve had a couple stouts that are just outstanding. This one really has a nice sweeter taste to it. I was really surprised on how this one turned out. It has some wonderful notes of coffee and just a hint of licorice coupled with it’s nice and roasted smokey profile. It is a fully bodied beer with a smooth and creamy soft mouthfeel with moderate carbonation (but more than expected). As you can see from the video the sun has a hard time penetrating through the glass of the fine black stout thanks to the roasted barley. I can’t take full credit for making it as I purchased all of the ingredient. It was just a matter of putting them together correctly and waiting. It has a slight aroma of graininess and smoke. This batch turned out without any harsh characteristics or one characteristic overpowering the other, rather, just a nice enjoyable pleasant mix of all. The froth and creaminess of this stout seems to balance it all out and bring it all together. This beer is Vegan, however, I’m not sure if it’s necessarily Gluten free. No animals were killed during the brewing of this beer. The question gets asked sometimes, “Is Stout Good For you?”. It’s allegedly full of antioxidants and flavonoids which are the same thing that give fruits and veggies their dark color. Getting these anti-oxidants into your system is great for your heart and what a better way to do it than a tall glass of this nice home brewed delicious stout. Antioxidants are molecules that neutralise free radicals – unstable molecules that can harm your cells. We usually find them in foods such as raspberries, kale and artichokes – amidst many other fruits, vegetables and nuts. The health benefits associated with a diet packed with plants are at least partially due to the variety of antioxidants they provide your body! It’s been said that this will slow down the deposits of cholesterol on artery walls reducing risk of heart attacks. Stouts also generally have less calories per serving than other lighter beers!
Here's a paid link to the kit:
Irish Stout Homebrew Beer Ingredient Kit:
https://amzn.to/3zQQsNh
DIY GateHouse Hinge Pin Door Stop Installation Tutorial Demonstration [G...
DIY GateHouse Hinge Pin Door Stop Installation Tutorial Demonstration [Gatehouse Hinge Pin Doorstop]. The first step is to buy a couple of these and then pop the hinge pin on the door. I used a small screwdriver and lightly tapped it out of place. I installed these individually one by one. Once the hinge pin is removed I pushed the door stop down over the hinge pin and tapped it back into place. Once installed the hinge pin doorstop can be adjusted to your desired setting to either open further or open less. In this case I needed to keep the door knob from hitting the glass closet doors and causing a huge destructive mess so it was mandatory I put these on. Super easy installation and quick too. The door stops are cheap compared to a hole in the wall or a busted closet door. Thank you for watching and please leave me a comment or two.
Here's a paid link to a similar one on amazon:
Ives by Schlage 70A10B Hinge Pin Door Stop:
https://amzn.to/3zEZxbB
Please visit www.diy-technician.com
Thursday, July 22, 2021
RELIABILT Bethany Mirror Sliding Closet Doors Part#201655 Installation T...
These Reliabilt brand mirrored sliding closet doors (part # 201655) come with the top rail and bottle rail (roller guide) as well along with fasteners. Aside from the tools needed to saw the top guide rail and the roller guide, it comes with all the hardware that you need for this simple installation. You may want to remember to bring along some rope if you are hauling it via truck so that you can tie it down and keep it from sliding around. These doors were super simple to install and can be installed very quickly. They look sharp as well.
Tools I used: Cordless drill, drill bit, phillips screw head bit and hack saw. I also used an electric hand held angle grinder with a cutting wheel on it.
Step 1: Before going to hardware store or ordering, measure your dimensions (height and width in inches)
Step 2: Take dimensions with you to the store when picking out doors. Make sure your door dimensions are less than or slightly smaller than the dimensions of the doors you will be purchasing. Too large typically won’t work unless you can make modifications to the framing around the closet which isn’t preferable.
Step 3: Once you’ve purchased your doors and have hauled it home. Carefully unbox the doors and set out all your parts. You should have two sliding closet doors, one top track to facilitate the sliding of both doors, the bottom roller track, fastening screws and the rubber bumper stick ons.
Step 4: Measure, mark and cut your top track with a hack saw. To keep the metal top track from distorting you can use a 2X4 to stick in the track to keep it from folding on itself. I started the cut with a hacksaw but ended up just using an angle grinder with a cutting wheel on it. Be sure to use safety glasses, gloves and hearing protection if you are going to be using this method.
Step 5: Install top track with the provided 1.5” fastening screws. There should be 8 (eight) of them.
Step 6: Measure and cut bottom track. Drill holes and screw it down with fastening screws.
Step 7: Using a cordless drill or manual phillips screwdriver, drive out the wheels as much as necessary by tightening the phillips head screw at the top of each wheel.
Step 8: Install the doors. I installed the back one first by stiding the top into the track and then setting the wheels in the roller guide track. Do the same with the other door.
Step 9: (Final Step): Install the rubber stick ons for use as bumpers onto the ends of the doors so that if they are slammed they are less likely to break. The kit only comes with four which is only enough for one side of each door. I wanted to install them on both sides and I had some laying around from a prior project so I put them on both ends of the doors. This way they may be opened up either way with no increased risk of fracturing the large mirrored doors.
They make these all-inclusive kits so that they can be easily installed quickly. The parts are lightweight and can easily be done by just one person. The mirrored doors are nice as they can make a smaller size bedroom appear larger. If you are looking for an upgrade this is a nice way to go as well as being relatively cheap to many other closet door options. This same installation method can be used for non-mirrored sliding closet doors. My width for this closet door was 59.5” and the door kit said 60”. This was just fine as the doors overlap a little, which is what I wanted to that worked out perfect. The height was approx. 81” so this worked as well due to the wheels having adjustable height screws in which to lower or lift the sliding closet doors into the groove of the upper guide for a nice secure fit.
Tuesday, July 6, 2021
PowerBeats vs. BOSE Sport Ear Buds Comparison | Sound/Cost/Comfort [Powe...
PowerBeats vs. BOSE Ear Buds Comparison | Sound/Cost/Longevity/Comfort [Powerbeats Bose Comparison]
Here's a paid link to some Powerbeats and Bose Sports:
Powerbeats High-Performance Wireless Earbuds - Apple H1 Headphone Chip, Class 1 Bluetooth Headphones, 15 Hours of Listening Time, Sweat Resistant, Built-in Microphone - White: https://amzn.to/3hFM4sL
Bose Sport Earbuds - True Wireless Earphones - Bluetooth In Ear Headphones for Workouts and Running, Triple Black:
https://amzn.to/3qQsuyg
About Bose Ear Buds and my comments in ():
Wireless Bluetooth earbuds engineered by Bose for your greatest workout ever.(Not always true)
Bose lifelike sound makes the tunes sound like the performer is right there beside you, pushing you to go 1 more mile or do 1 more rep.(I'll give them this one but only when they are new. Once old they become less clear and have volume and sync issues)
Secure & comfortable earbuds: Customize your fit with the included 3 sizes of StayHear Max tips that won’t hurt your ears and won’t fall out no matter tough your workout is.
Weather and sweat resistant earbuds: IPX4 rated, with electronics wrapped in special materials to protect from moisture wherever you exercise (They fall out after you get sweaty)
Clear calls: A beamforming microphone array separates your voice from surrounding noise so your callers can hear you better.(The phone con feature on this was horrible)
Simple touch controls: Instead of buttons, the capacitive touch interface lets you swipe up and down for volume control (opt in feature via Bose Music App), tap to play or pause music, answer calls, and more. (Tough to do while running, usually need to stop to adjust)
Long battery life: Up to 5 hours per charge with the included charging case, plus up to 2 more hours with a 15-minute quick charge on the go. (This is a stretch)
About the beats:
High-performance wireless earphones (lightweight and loud!)
Up to 15 hours of listening time (True)
Adjustable, secure-fit earhooks for comfort and stability (True. Very comfortable)
Reinforced, sleek design for sweat & water resistance during tough workouts or running
Improved connection speed via the Apple H1 headphone chip (Yup)
Compatible with iOS and Android devices (worked great with my iPhone)
Class 1 Bluetooth for extended range and fewer dropouts (Ok sure)
Tuesday, June 29, 2021
Saturday, June 19, 2021
Craftsman Battery Powered Weed Wacker Leaf Blower Combo [Craftsman V20 L...
Craftsman Battery Powered Weed Wacker Leaf Blower Combo [Craftsman V20 Leaf Blower Battery Operated] Purchased at Lowes for $129 plus tax which came out to $140.00. Good unit but the battery life only lasts for 15 minutes on high at full charge. If you have two batteries you can get 30 minutes or so out of it. Great light weight unit just doesn't last as long as you'd expect. Many positives to this one though. Low cost, light weight, easy assembly, cheaper than gas, comes with edger line, etc.
Here's one on amazon(paid link):
CRAFTSMAN WEEDWACKER 20V MAX String Trimmer and Leaf Blower Combo Kit (CMCK197M1 ):https://amzn.to/3gFAmzh
Sunday, May 23, 2021
Friday, May 21, 2021
DIY Building Outdoor Chain Link Dog Kennel Roof [DOG KENNEL]


This is the final product. I show the below steps from start to finish on this nice new dog kennel.


This tarped over dog chain link fenced in dog kennel needed a nice roof put on it. The tarp and fence served their purpose but it's time for more of a permanent fix.


The first order of business is to pull off the old scabbed together cross members that offered some temporary support for the tarp. Once the old "roof" was off I took some measurements and headed out to Lowes. I bought some two by fours, one by threes, plastic roofing, some screws, brackets, moulding to match the roof and some small nails to hold the plastic roof moulding down to the frame.


I took the 2X4's and played them across the top of the dog kennel fencing.


I then took the outer perimeter roof 1X3's and screws them dow to the 2X4 cross members making sure the frame stayed square.


I then nailed the moulding for the roof down to the cross members. I used some smaller sized nails so as not to crack the thin moulding.


Now its' time to lay the sheets of the plastic roofing down into the moulding. It fit quite nicely.


This took a little bit of time but not much at all. I overlapped the plastic roofing as well.


The overlap prevents the water from getting down into there.
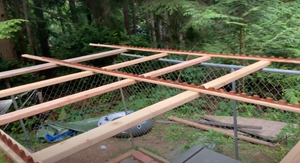

This is a shot of the roof before the plastic sheeting gets put on. It shows almost the full installation of the roof moulding.


Once the sheets are overlapped I screwed them into the moulding with screws containing rubber grommets. If I could do this job again I think I would screw to the top of the moulding rather than in the valley to allow the water to flow more freely and also so it wouldn't be a stopping point for catching tree debris.


Slapping it all up there and screwing it down. This was all a one man job as all of the materials are very light and easy to work with.


I used brackets to secure the roof to the side walls of the chain link kennel to keep it from sliding off.


Here it is with all of the plastic sheeting put up and screwed down.


I secure the roof more with the brackets. The brackets are galvanized so they won't rust. I used a cordless drill to screw these in.
This is the spot/side where the water will run off. It's very slightly angled (not on purpose) so it makes it nice.I think if it wasn't already angled a little bit I'd stick some shims or some sort of riser under one side in order for it to have some kind of slope.


The dogs loved it. This acts as just a temporary shelter for them due to it's size. They get to stay inside during the night and in times of harsh weather.


Here's one last shot of the finished product. Way more sturdy than the tarp that was on there before.
Tuesday, May 11, 2021
Monday, May 10, 2021
How to Charge Your Streetbike Motorcycle Battery Tutorial Demonstration [Motorcycle Battery Charge]


Subscribe to:
Posts (Atom)